Push notifications have one awkward weakness. You know almost nothing about the people on your list.
Someone clicked Allow once. That is all you have. No name, no email, no idea what they were shopping for. You can see roughly how many subscribers you have and what browser they use, and that is about it.
So when you send something, you are mostly guessing. You pick a product, send it to everyone, and hope enough of them care.
The buttons on your product pages are how that changes. They are the one place where a subscriber tells you exactly what they are waiting for.
First, What These Buttons Are Not
Let us clear this up early, because it is easy to think the opposite.
These buttons do not ask anyone to sign up for notifications. They do not show a permission popup, and tapping one will not turn a stranger into a subscriber.
They only show up for people who already get your notifications.
That makes sense when you think about how push works. To send someone a back in stock alert, you need permission to reach their browser. If they never allowed notifications, there is nowhere to send the message. The button cannot create that permission, so it waits until it is already there.
Growing your list is a different job, and it belongs to the permission popup. We cover that in our permission prompt guide. These buttons take over after that to do something a popup cannot do.
What They Actually Do
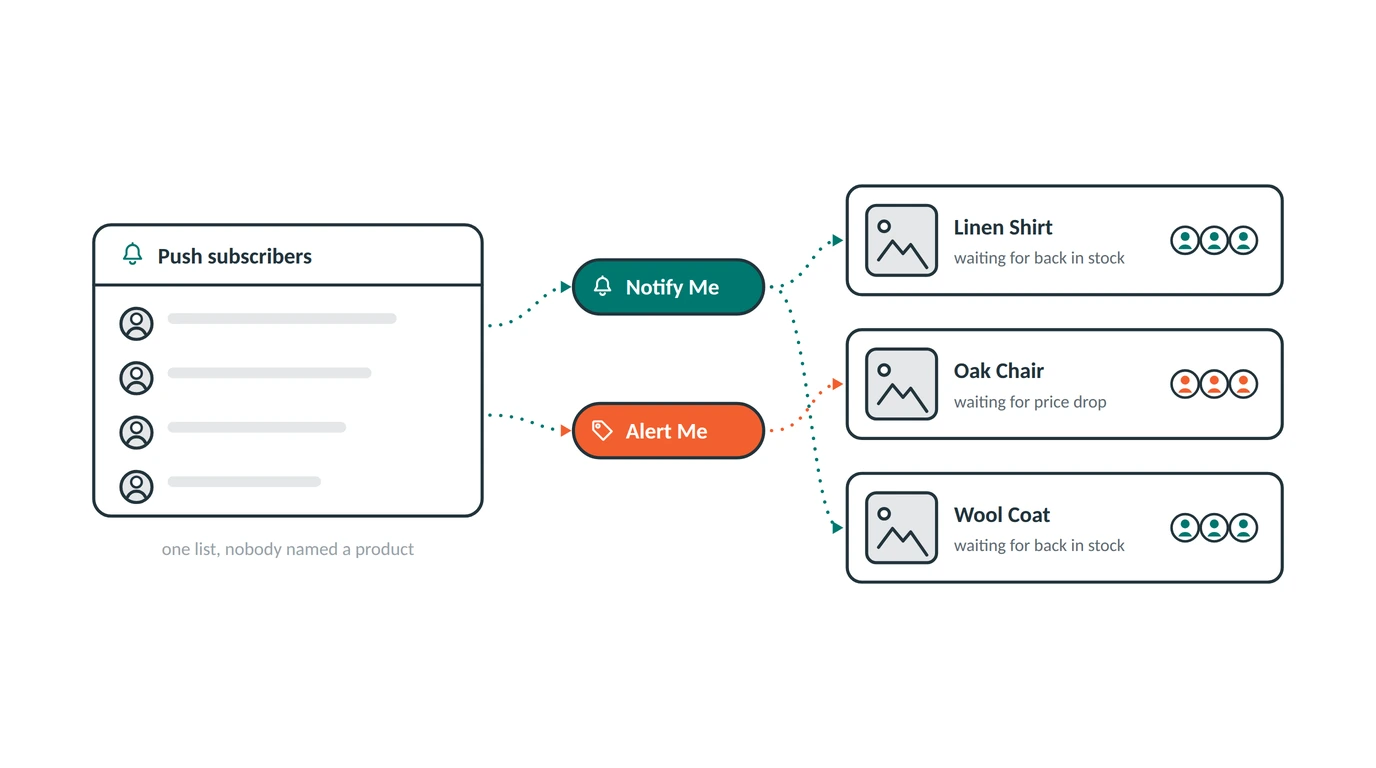
They turn one big list of strangers into many small, specific ones.
The button sits on a product page. It comes in two forms:
- Notify Me, on a product that is sold out. “Get a message when this item is back in stock.”
- Alert Me, on a product someone thinks is too costly. “Get a message when the price drops below what it is now.”
When a subscriber taps either one, something useful happens. They stop being subscriber number 4,182 and become a person waiting for a navy linen shirt in size medium.
You did not have to ask them anything. You did not run a survey. They told you by tapping a button, at the exact moment they cared.
Why This Beats Guessing
Think about the two ways you could send a message about a restocked product.
Without the button, you send it to your whole list. Most of those people never looked at the item. To them it is a random ad. Some ignore it, some get annoyed, and a few turn off notifications. The handful who really wanted it are hidden in the crowd, and you have no way to find them.
With the button, you send it only to the people who raised their hand for that product. Every single person getting it asked for it. Nobody is annoyed, because nobody got a message about something they do not care about.
Same product, same message, completely different result. The difference is that you knew who to send it to.
This is also the quiet reason your list stays healthy. People leave when messages feel pointless. Sending fewer messages that actually match what shoppers want is how you keep them around long enough to buy.
Two Things These Buttons Tell You
Even without sending alerts, seeing what people tap is very useful.
Which products people want but cannot buy yet. A long Notify Me list on a sold out item tells you what to reorder and how much, before you spend money on stock.
Which products cost more than people will pay. A long Alert Me list tells you about your prices. Nobody fills in a form to say your product is too costly. They just leave. This list is the closest you will get to shoppers saying it out loud.
Even if you never sent one alert, both lists would be worth having.
Making Them Look Like Your Store
A button only gets used if it looks like a natural part of your store rather than something added on awkwardly.
You can customize:
Where it sits. Bottom left or bottom right of the product page, with space from the edge so it does not cover your buy buttons.
The colors. Background color, text color, button text color, and the bell icon can all match your store.
The button text. The defaults are Notify Me and Alert Me. Change them to whatever words fit your brand best.
The wording. Both the invite line and the thank-you message shoppers see after tapping can be rewritten.
The movement effect. A subtle animation so the button gets noticed without being annoying. You can pick a gentle pulse, a bounce, a float, and a few others. Pulse is the default and usually works best.
A few practical rules: Do not cover the add-to-cart button on phones. If you already have a customer chat bubble in one corner, put this button in the other. And always check it on a real phone to make sure buttons do not overlap.
Which One Should You Turn On?
Both start switched off, because each needs its button added to your product pages first.
Turn on Notify Me if you run out of popular items often, sell small batches, or have sizes that sell out while the product stays listed.
Turn on Alert Me if your products cost enough that people stop and think, you run sales through the year, or you sell things people compare prices on.
Once a button is collecting taps, the automation behind it does the rest. We cover those in the back in stock guide and the price drop guide.
Common Questions
Do these buttons ask visitors to sign up for notifications? No. They only show to people who already get your notifications. Growing your list is the permission popup’s job.
What happens if a visitor is not a subscriber? They will not see the button. Your permission popup is what invites them to sign up first.
Does the shopper give an email address? No. You never learn who they are. They tap once and you can reach them.
Should I use the permission popup and these buttons together? Yes, and in that order. The popup builds your list. The buttons tell you what the list wants. One without the other leaves you either with nobody to talk to, or with people you know nothing about.
Can I change the wording and colours? Yes. Button text, the invite line, the thank you message, colours, position, and the small effect can all be changed.
What happens after someone taps it? They see a short thank you, and PingLane starts watching that product for them. When the stock or the price changes, the message sends on its own.
Stop Sending to Everyone
The biggest waste in push marketing is sending a message about one product to thousands of people who never looked at it.
Your subscribers already know what they want. These buttons are simply the place where they can tell you, and the difference between a list you shout at and a list you actually understand.
Install PingLane from the Shopify App Store and let your subscribers show you what to send.